Following my earlier article on Destination SDK, I decided to write an in-depth article with practical insights. Much is written about Adobe Experience Platform (AEP) Destination SDK, but most articles get stuck in configuration screens, JSON snippets and the promise that you can connect to any endpoint. That's correct. But it only becomes valuable when you can run through the whole process and master the entire chain end-to-end.
In this article I take you through a proof-of-concept where I not only built a private destination, but tested the entire activation chain: from the moment an event enters the Edge Network to the webhook that receives the profile. I take you through common mistakes, frustrations and insights, with the goal of making the practical value of Destination SDK tangible.
To make this process reproducible, I built a lightweight test tool: Destination SDK Lab, a Streamlit app that you can run locally. I'm happy to share that tool upon request.
Why Destination SDK?
Within Adobe Experience Platform you sooner or later reach the point where you need to share data with destination that are not available in the AEP destinations catalog. Or you just want to trigger an action in an external system. Think of a profile that gets a certain segment status and must immediately send an update to Salesforce, a DSP or an internal API.
On paper that sounds simple: data available, use case clear, so forward it. In practice you can get stuck surprisingly quickly. Standard (native) connectors don't cover nearly everything, and if they do exist, they often don't support the behavior you need.
Then you reach a crossroads: either build completely custom, or opt for a flexible solution. That's exactly where Destination SDK becomes valuable. Instead of relying on a native connector, you can use Destination SDK when you need full control over how data is structured, aggregated, and delivered. It allows you to shape the payload around the exact requirements of the receiving endpoint, rather than forcing your integration into the limits of a standard connector.
The use case: when there is no connector
A concrete example: suppose you work for an online gambling provider that is legally required to exclude persons who have self-excluded from the marketing funnel. One of your DSPs has no native Adobe connector, the data must go to a custom API.
You quickly run into two problems: the segment qualification must be synchronized in real-time, and there is no off-the-shelf (native) connector. Destination SDK is then the obvious solution, but how do you prove it works without setting up a complete website?
That's the core of this POC. In practice people test too quickly with a full front-end: Web SDK, cookies, consent flows, the entire ecosystem. For a proof-of-concept that's often overkill. You want to validate one thing: does a profile qualify correctly and does it arrive in the right way (timely) at the endpoint?
Setup: what you minimally need
For this POC I deliberately kept the setup compact, no enterprise configuration, just the essentials:
- Sandbox: within Adobe Experience Platform
- Schema: based on XDM ExperienceEvent (with identity and web field groups)
- ExperienceEvent dataset: (and ideally also a profile dataset), both enabled for Real-Time Customer Profile and Identity Service
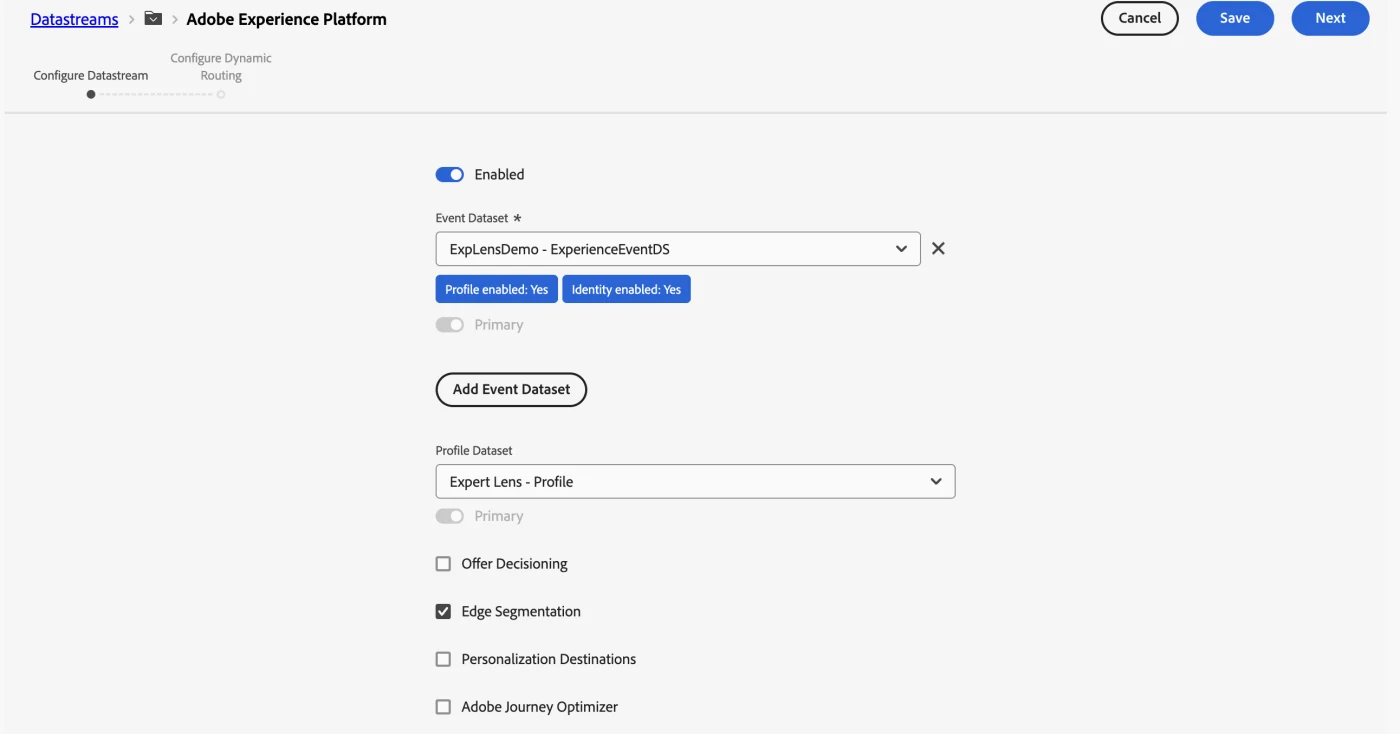
- Datastream: with AEP service enabled and the dataset linked
- Identity namespaces: such as ECID and Email_LC_SHA256
- Adobe I/O integration: via the Adobe Developer Console: ORG_ID, CLIENT_ID, CLIENT_SECRET, SANDBOX_NAME
In this example the datastream is the connection point between your Edge API calls and AEP. Here you configure which dataset receives events, and whether you activate Edge Segmentation and/or Streaming Evaluation. In practice Edge Segmentation proved unstable on my sandbox.
License and access rights
Private custom destinations are only available for customers with the Real-Time CDP Ultimate package. Partners can gain access through the Technology Partner Program (ISVs) or through the Solution Partner Program at Gold or Platinum level. Also make sure you have the Destination Authoring role in the Admin Console.
Edge API simulation
You can choose to simulate a Web SDK flow via the Edge Network Server API. With a curl call to the Edge interact endpoint you inject events as if they come in via the Web SDK, without website, without front-end.
curl -X POST "https://edge.adobedc.net/ee/v2/interact?dataStreamId=<DATASTREAM_ID>" \
-H "Content-Type: application/json" \
-d '{
    "event": {
        "xdm": {
            "timestamp": "2026-04-16T14:50:00Z",
            "eventType": "web.webpagedetails.pageViews",
            "identityMap": {
                "Email_LC_SHA256": [
                    {
                        "id": "a1b2c3...",
                        "authenticatedState": "authenticated",
                        "primary": true
                    }
                ],
                "ECID": [
                    {
                        "id": "123456...",
                        "authenticatedState": "ambiguous",
                        "primary": false
                    }
                ]
            },
            "web": {
                "webPageDetails": {
                    "name": "poc-test-page",
                    "URL": "https://example.com/test"
                }
            }
        }
    }
}'
The timestamp must be current. Without a recent date your event does not qualify. A common mistake is also confusing streaming inlets with the Edge interact endpoint, those are two different ingestion paths.
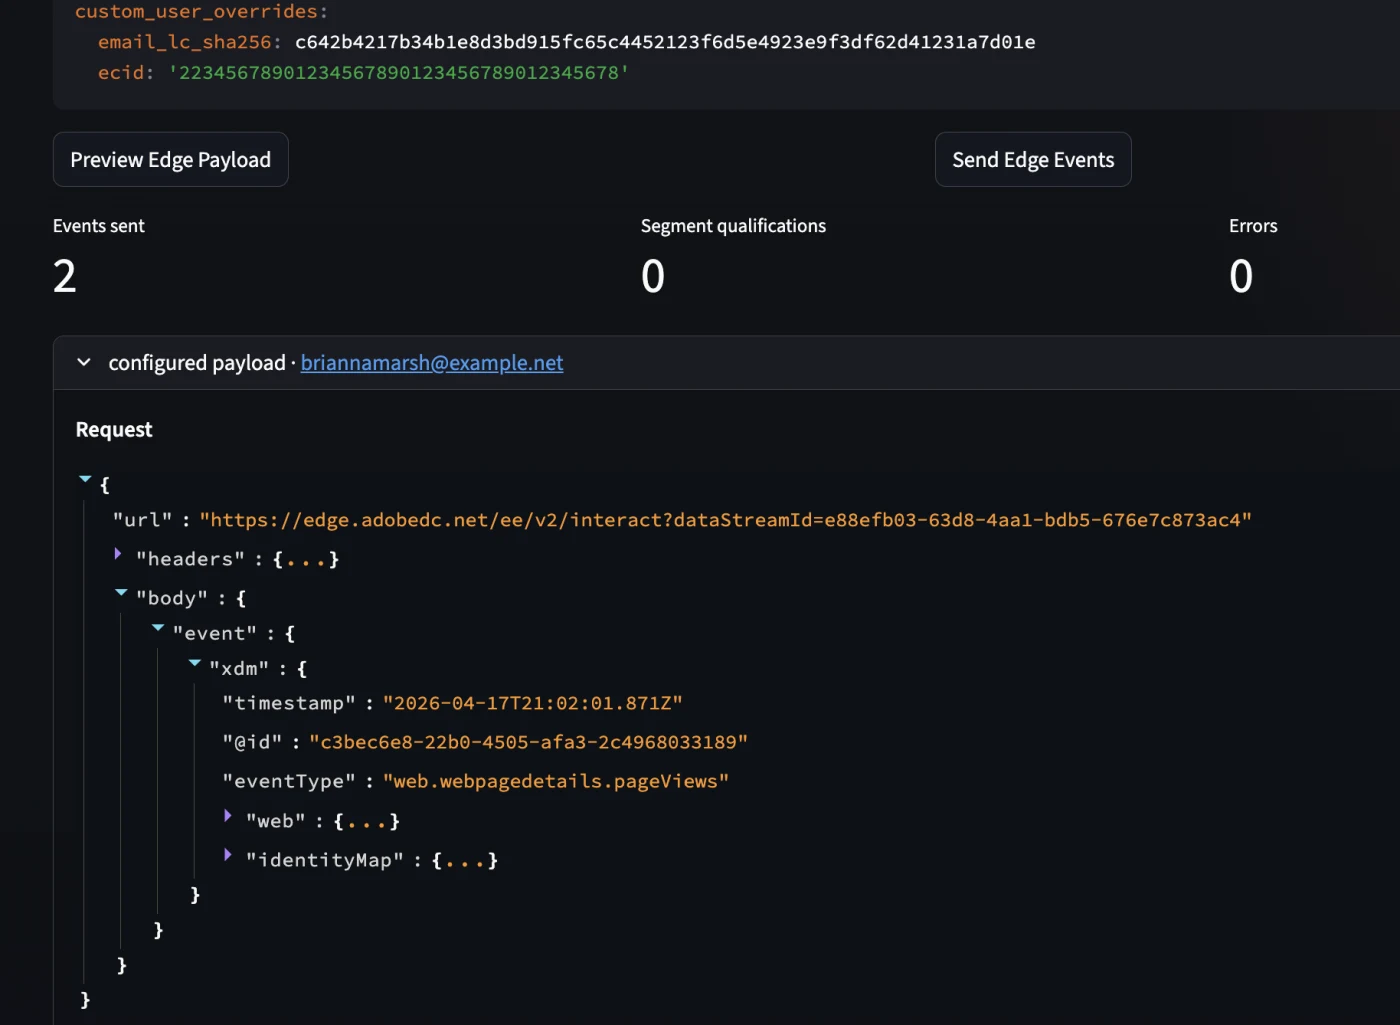
The payload: small, but deliberate
The goal was not to simulate perfect business data. The goal was to prove the chain. Therefore the payload was deliberately kept simple, but rich enough to make stitching and segmentation work.
A representative example looks like this:
{
    "url": "https://edge.adobedc.net/ee/v2/interact?dataStreamId=e99efb03-63d8-4aa1-bdb5-676e7c873ac4",
    "headers": {
        "Content-Type": "application/json"
    },
    "body": {
        "event": {
            "xdm": {
                "timestamp": "2026-04-17T21:02:01.871Z",
                "@id": "c3bec6e8-22b0-4505-afa3-2c4968033189",
                "eventType": "web.webpagedetails.pageViews",
                "web": {
                    "webPageDetails": {
                        "name": "poc-test-page",
                        "URL": "https://example.com/poc-test-page",
                        "pageViews": {
                            "value": 1
                        }
                    }
                },
                "identityMap": {
                    "Email_LC_SHA256": [
                        {
                            "id": "63d885f73a891049002005c9aee95894a7feebb219a8bf4aca0c8a91133f1fcd",
                            "authenticatedState": "authenticated",
                            "primary": true
                        }
                    ],
                    "ECID": [
                        {
                            "id": "63604305161667845924488878647712751313",
                            "authenticatedState": "ambiguous",
                            "primary": false
                        }
                    ]
                }
            }
        }
    }
}
Here are precisely the fields that matter:
- a current timestamp
- an eventType
- an identityMap with two identities
- a page name that will be used later for segment qualification
The timestamp must be current if you want streaming or edge-near evaluation. The identityMap is needed to link identities to each other. And web.webPageDetails.name is in this case the trigger for the test segment.
To simplify the workflow you can activate an "Edge Simulation" for your own test environment, this option is available in the app: 4 - Test & Simulate. After entering the datastream ID you can send a test payload to the dataset that is configured.

After the first successful responses it quickly became clear that "getting a 200 back" is not the same as "now I immediately see my data in the UI".
There was an important lesson there. The validation ran through four routes:
- dataset activity
- preview dataset
- query service
- identity graph viewer
Check whether the correct event dataset is actually linked to the datastream. That sounds logical, but in practice this is exactly the kind of detail where you lose valuable time, especially if you have multiple datasets and schemas side by side.
There was something else too: streaming ingestion via Edge uses micro-batching. The UI is not always synchronized with what is already happening behind the scenes. So you can get a valid response back while dataset activity or preview still lags behind.
That is precisely why Query Service and Identity Graph are so valuable in debugging. A simple control query would then be for example:
SELECT *, eventType, timestamp FROM explensdemo_experienceeventds
ORDER BY timestamp DESC LIMIT 10

Identity stitching and profile building
The real turning point in this POC was not the moment an event was accepted, but the moment it became visible in the identity graph that ECID and Email_LC_SHA256 were actually linked to each other.
That was proof that the flow not only processed events, but also actually did profile formation. From that moment the chain was confirmed up to here:
event → dataset → identity stitching → profile

And that is more important than it seems at first glance. Because only when that is correct does segmentation make sense at all.
Segment creation: logical on paper, challenging in practice
For the segment rule something deliberately simple was chosen: an event rule based on the page name, for example:
pageName equals "poc-test-page"
In theory edge evaluation seemed logical. The events come in via Edge, so you also want segment evaluation to take place there. While setting up the data collection I ran into a recurring 502 error from the edge segmentation service.
That was not an ingestion problem. The data came in. The identities were stitched. The problem was really in the edge segmentation service on this sandbox:
[
  {
    "type": "https://ns.adobe.com/aep/errors/EXEG-0203-502",
    "status": 502,
    "title": "The service call has failed.",
    "detail": "An error occurred while calling the 'com.adobe.experience_platform.edge_segmentation' service for this request. Try again.",
    "report": {
      "eventIndex": 0
    }
  }
]That is an important lesson: edge evaluation is not automatically the best choice for a POC. On paper yes, in a development environment not always. A 502 here means that the Edge Network reached the upstream Edge Segmentation service but received an invalid response. This can be:
- The service is not enabled for your org: the call fails immediately
- A temporary outage

The workaround ultimately proved simple and effective: disable edge segmentation on the datastream and convert the segment to streaming evaluation. This turned out to be much more reliable in practice.
Segment qualification confirmed
After that switch, it worked. The profile qualified for the segment and was visible in the audience profile viewer. It was also visible that the profile was active on edge and that both identifiers were present.
That is the payoff moment of the entire test: event data doesn't just lead to ingestion, but to profile building and segment qualification.
From there, you really only need to prove one more thing: does the profile actually leave AEP towards your custom destination?
The tool: Destination SDK Lab
Destination SDK Lab is a Streamlit app that you run locally on http://localhost. No extensive framework, just a practical layer on top of the Destination SDK APIs. The tool guides you through the entire flow: from retrieving an auth token, via creating a destination server and config, to live viewing what arrives at your endpoint.
To work with Destination SDK you need, in addition to a sandbox and the correct permissions, the standard Experience Platform API credentials: an access token, API key, Org ID and usually a sandbox name. You obtain these via Adobe Developer Console after being added as a developer to an Experience Platform product profile. Destination SDK itself is available for Real-Time CDP Ultimate customers and makes it possible to build private custom destinations and manage them via the Experience Platform APIs, here are some helpful links:
- Authentication and headers for Platform APIs:
- Authenticate and access Experience Platform APIs
- Beginner-friendly version with Developer Console + Postman:
- Platform API authentication tutorial
- General Experience Platform API starting page:
- Getting started with Experience Platform APIs
- Adobe Developer Console:
- Adobe Developer Console
Once your environment variables are correctly set, you go through the entire flow without manual JSON constructions or separate Postman calls. The tool remembers the IDs of the objects it creates and automatically connects them in the next step.
The tool is not publicly available but happy to share it upon request. Send me a message if you want to use it.
Installation
git clone <repo-url>
cd demo/python
pip install -r requirements.txt
streamlit run app.py
De app is accessible on: http://localhost:8502.
Requirements
- Python 3.10 or newer
- Access to an AEP sandbox
- Destination SDK access (Real-Time CDP Ultimate or partner status)
- Adobe Developer Console credentials:ORG_ID, CLIENT_ID, CLIENT_SECRET, SANDBOX_NAME
Step 1: Environment configuration (Sidebar)
The sidebar is the tool's configuration panel. Enter your AEP credentials here:
- CLIENT_ID and CLIENT_SECRET— from your Adobe Developer Console project
- SANDBOX_NAME— the name of the sandbox (e.g. 'prod' or a dev sandbox)
- BASE_URL and IMS_URL— pre-filled on the Adobe endpoints, adjustable if needed
- DEFAULT_ENDPOINT_URL— the webhook address where AEP sends deliveries to
Click 'Save .env Settings'. The sidebar also shows the Current State of the active session — including previously created server and destination IDs.
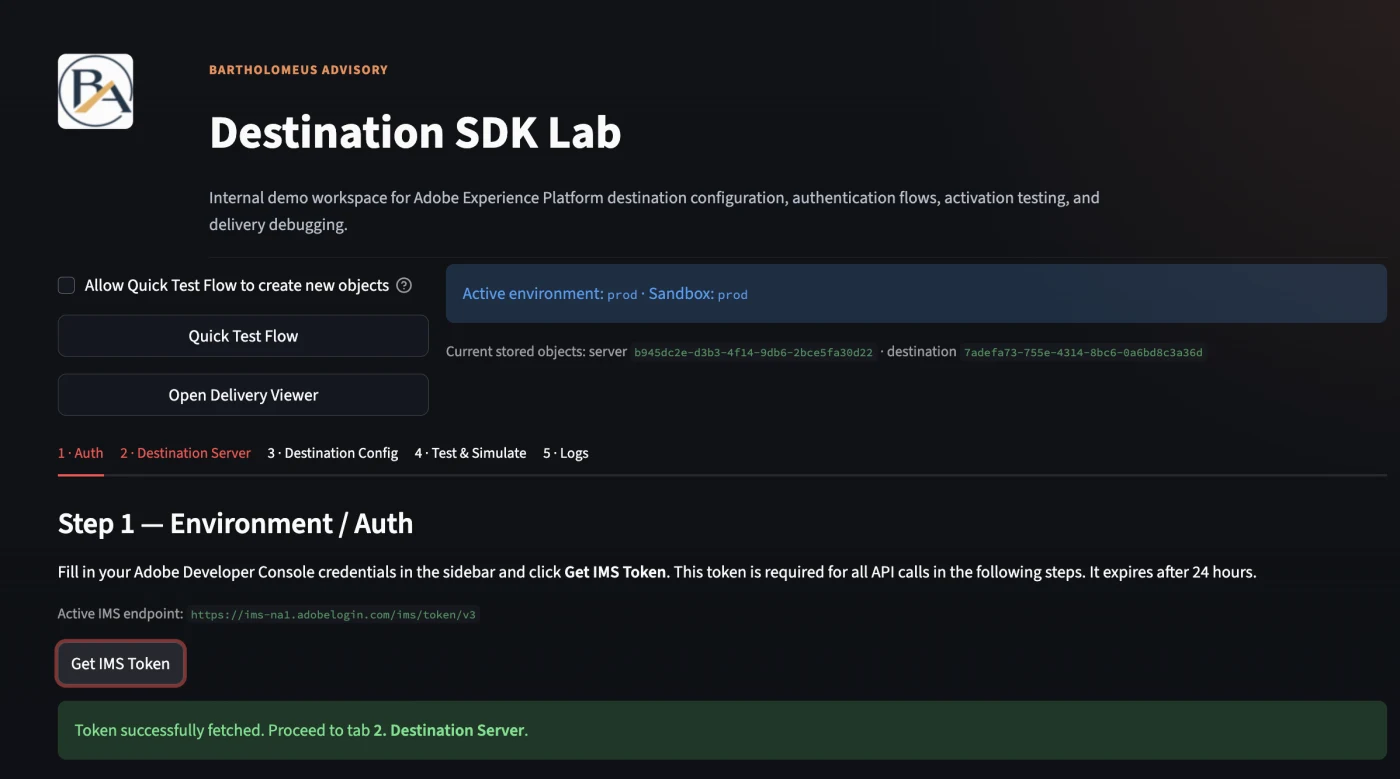
Step 2: Authentication (Environment / Auth tab)
Without a valid Bearer token, nothing works. On this tab you click 'Get IMS Token'. The tool automatically retrieves an access token and shows how long it remains valid. A token expires after approximately 24 hours — refresh in time, otherwise 401 errors will occur in all subsequent steps. The tab also shows a Profile Health Check that confirms your sandbox connection is active.
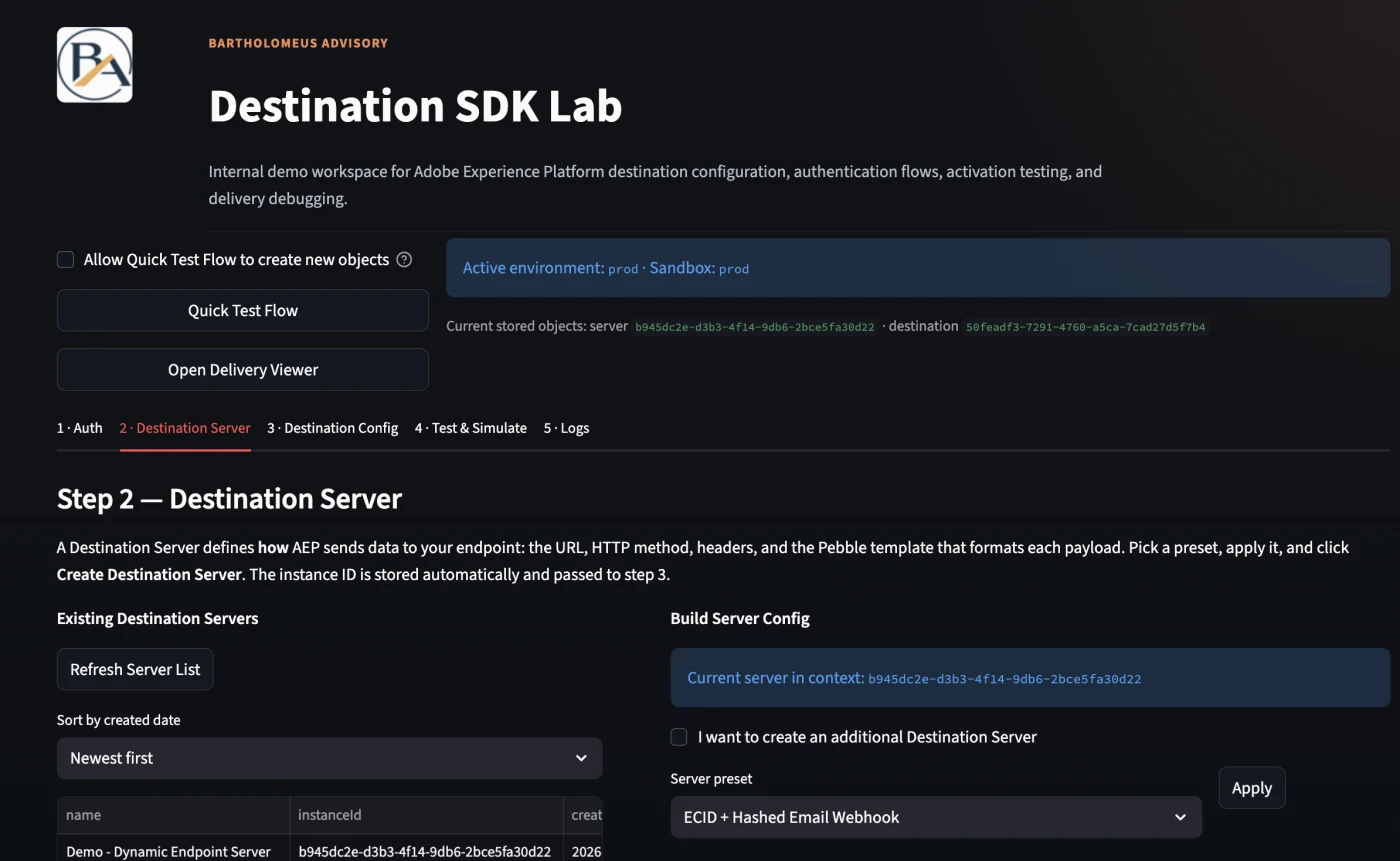
Step Create Destination Server (Destination Server tab)
On this tab you define how and where AEP sends data. The server is the transport layer:
- Server preset— choose a ready-made configuration, e.g. 'ECID + Hashed Email Webhook'
- Server name— give your server a recognizable name
- Endpoint URL— the webhook address of your mock or production endpoint
- Pebble template— determines which fields are included in the payload (note lowercase and double array depth, see section on identity mapping)
Click 'Create Destination Server'. The generated server ID is automatically saved and linked in the next step.
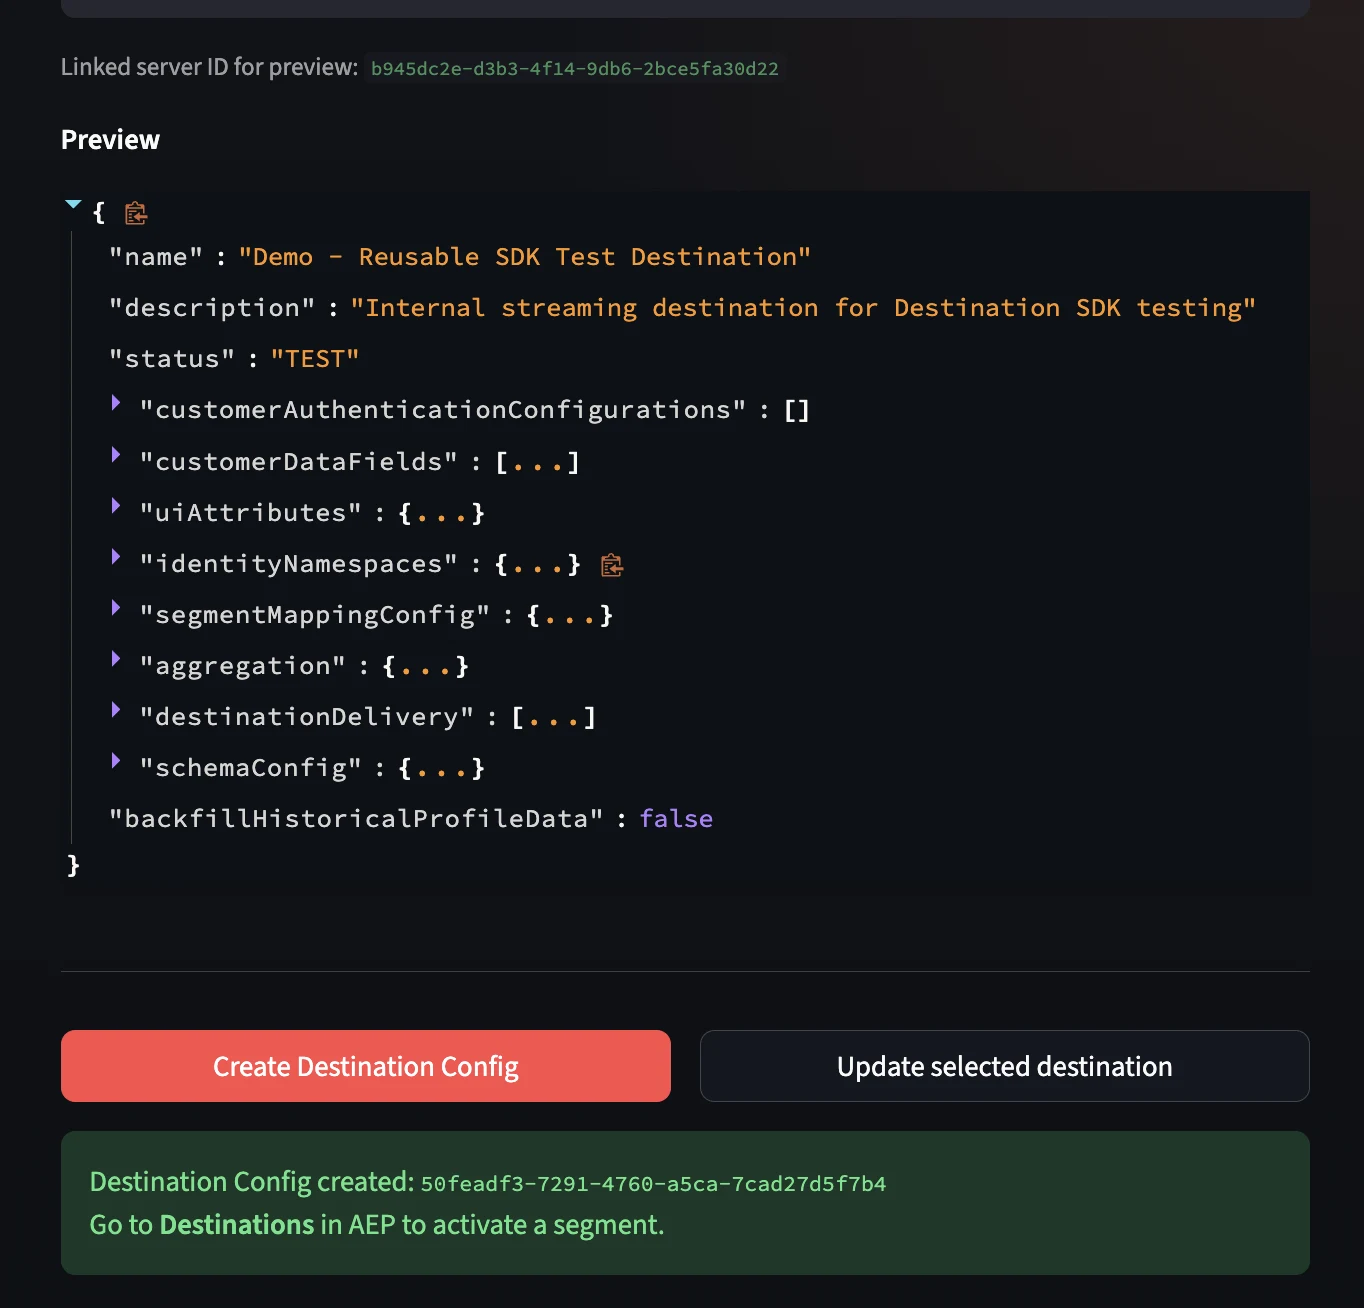
Step 4: Create Destination Config (Destination Config tab)
On this tab you define what is available in AEP and how the destination behaves in the UI:
- Destination preset:e.g. 'ECID + Hashed Email Activation'
- Destination name: the name that appears in the AEP Destinations catalog
- Identity namespaces: Email_LC_SHA256 (mandatory), ECID (optional)
- Aggregation and mapping options: how are profiles bundled into one payload?
Click 'Create Destination Config'. After successful creation, the destination appears in the AEP Destinations catalog under Custom : ready to activate.
Activation in AEP: from destination to delivery
As soon as the destination server and config are created via the tool, the destination automatically appears in the AEP UI. From here, the activation flow runs entirely within AEP : a wizard of five steps: Configure, Governance, Select audiences, Mapping and Review.
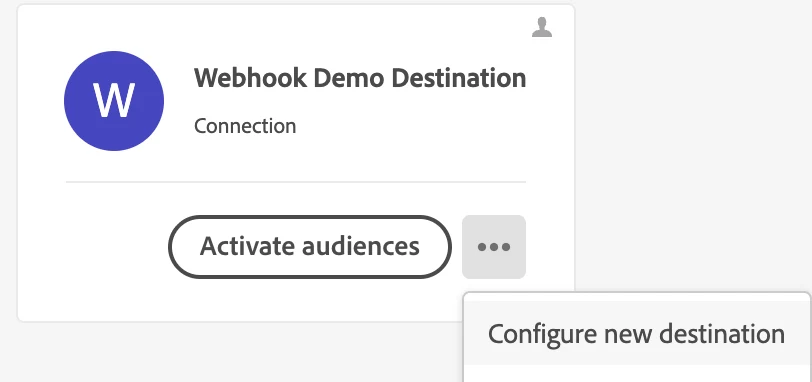
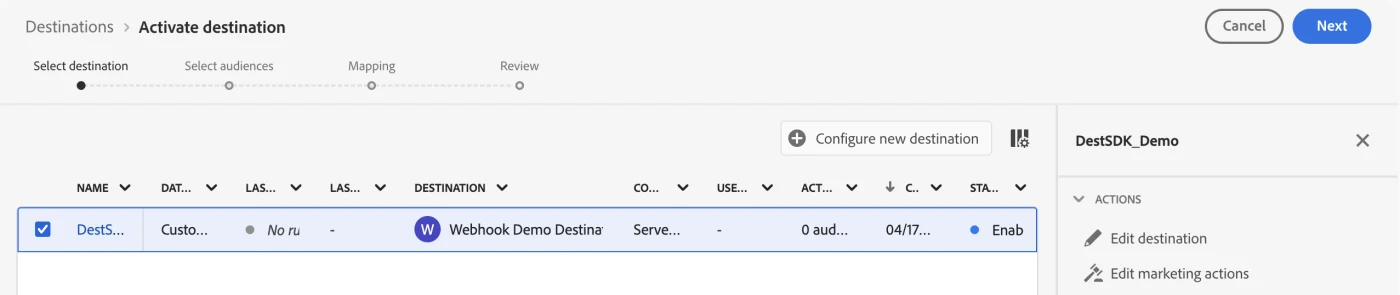
Step 5: Open Destination in AEP
Navigate in AEP to Destinations → Catalog. Your private destination is under the Custom section. Click 'Set up' to start the activation wizard.
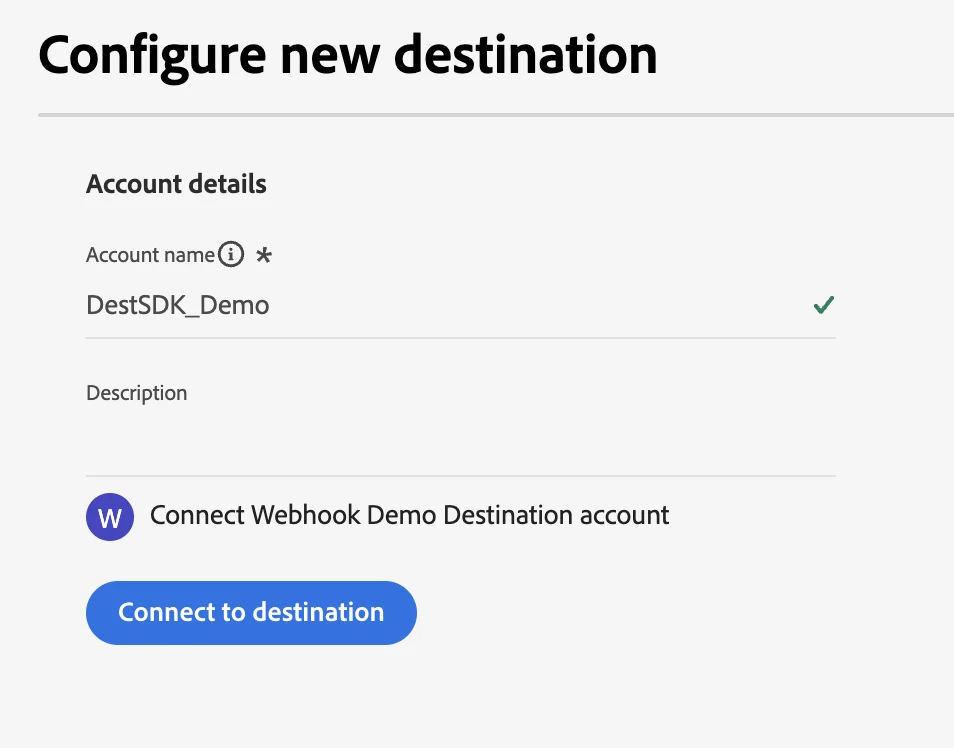
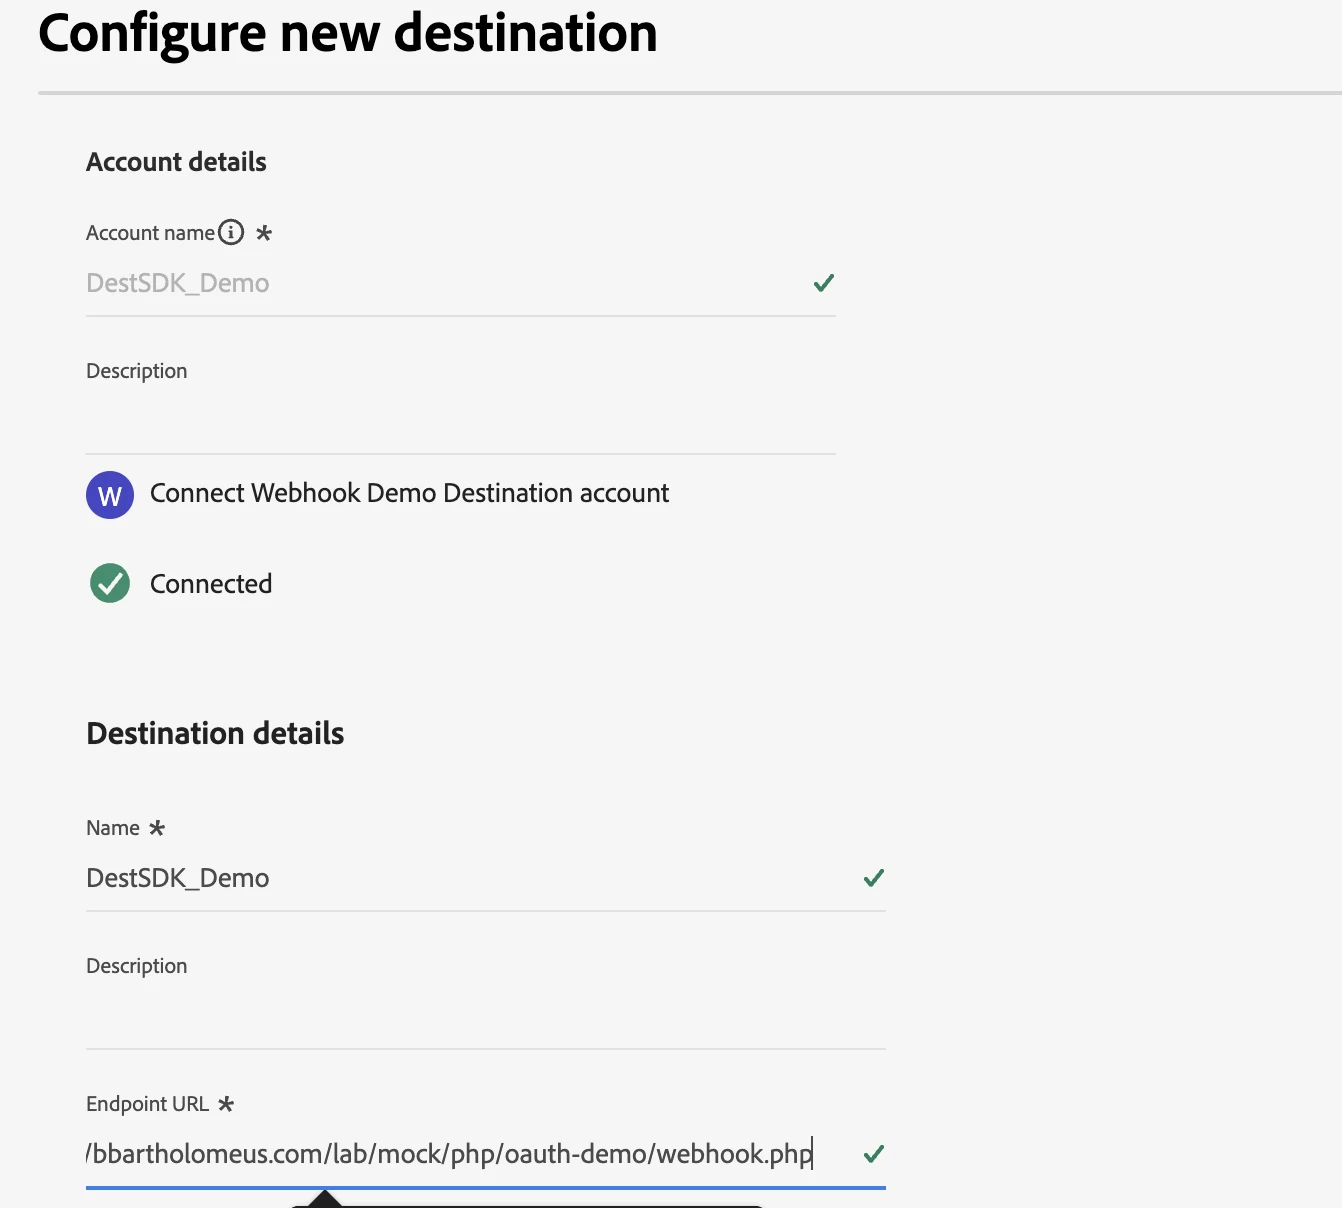
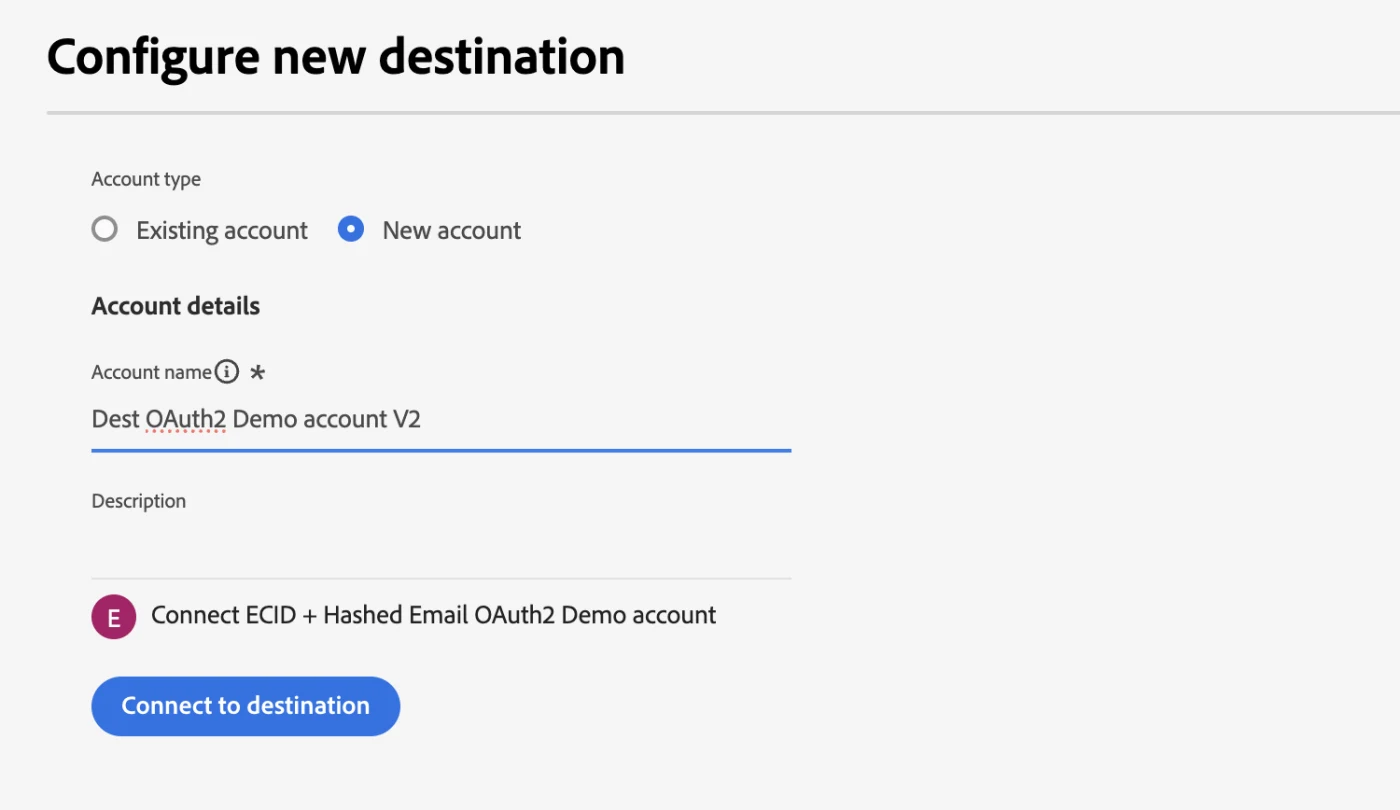
Step 6: Configure: establish connection
In the first step of the wizard you provide an account name and click 'Connect to destination'. If the connection succeeds, a green checkmark appears next to 'Connected'. Next, you set the instance name (e.g. DestSDK_Demo_v9) and confirm the endpoint URL.
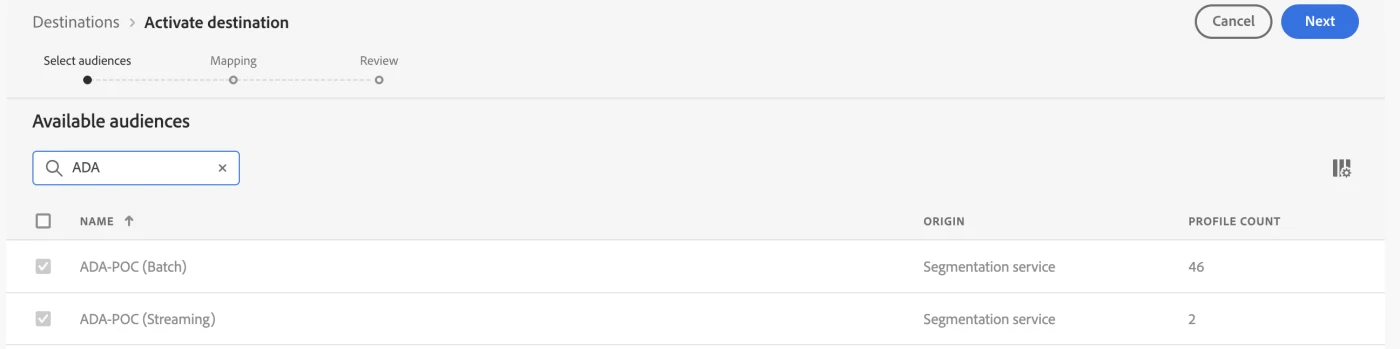
Step 7: Select audiences
In this step you select which segments you want to activate to this destination. For this POC I selected two audiences: one based on batch evaluation (ADA-POC Batch, 46 profiles) and one based on streaming evaluation (ADA-POC Streaming, 2 profiles). The difference in profile count directly illustrates the difference in evaluation method: batch includes historical profiles, streaming evaluates only on new events.
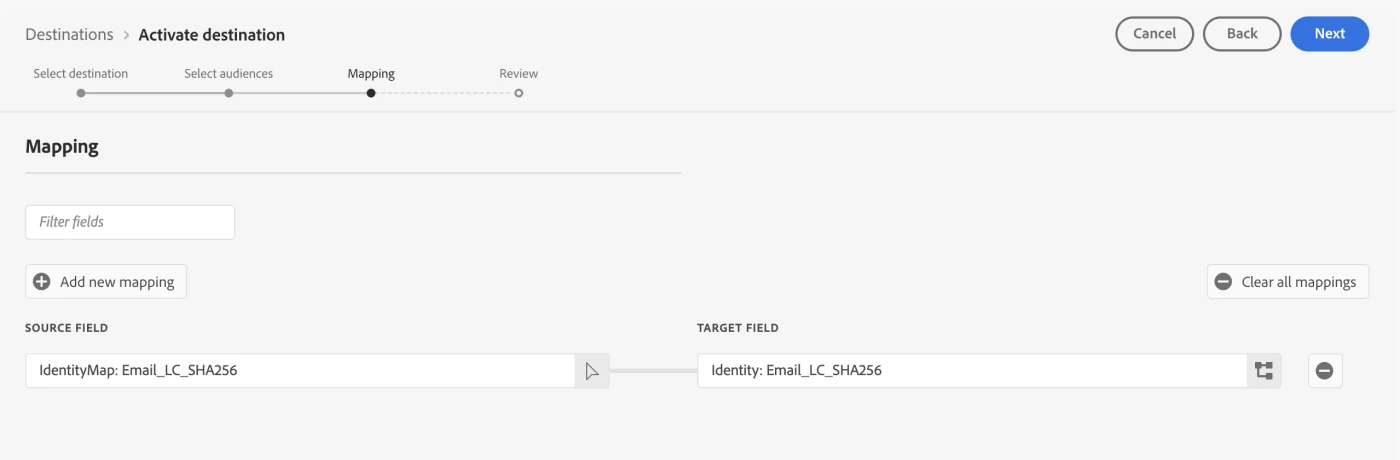
Step 8: Mapping: linking identities
The mapping step is technically the most critical. Here you define which identity fields from the profile are sent to your destination. In this case: IdentityMap: Email_LC_SHA256 → Identity: Email_LC_SHA256.
Note the difference: in the AEP UI you see the namespace as Email_LC_SHA256 (with capital letters). In the Pebble template and the runtime payload, the key is however email_lc_sha256 (completely lowercase). This is one of the most common causes of a silent, empty payload.
Step 9: Review and activation
The Review step shows a summary: connection status, number of selected audiences and the mapping. If everything is correct click 'Finish' and the destination is active.
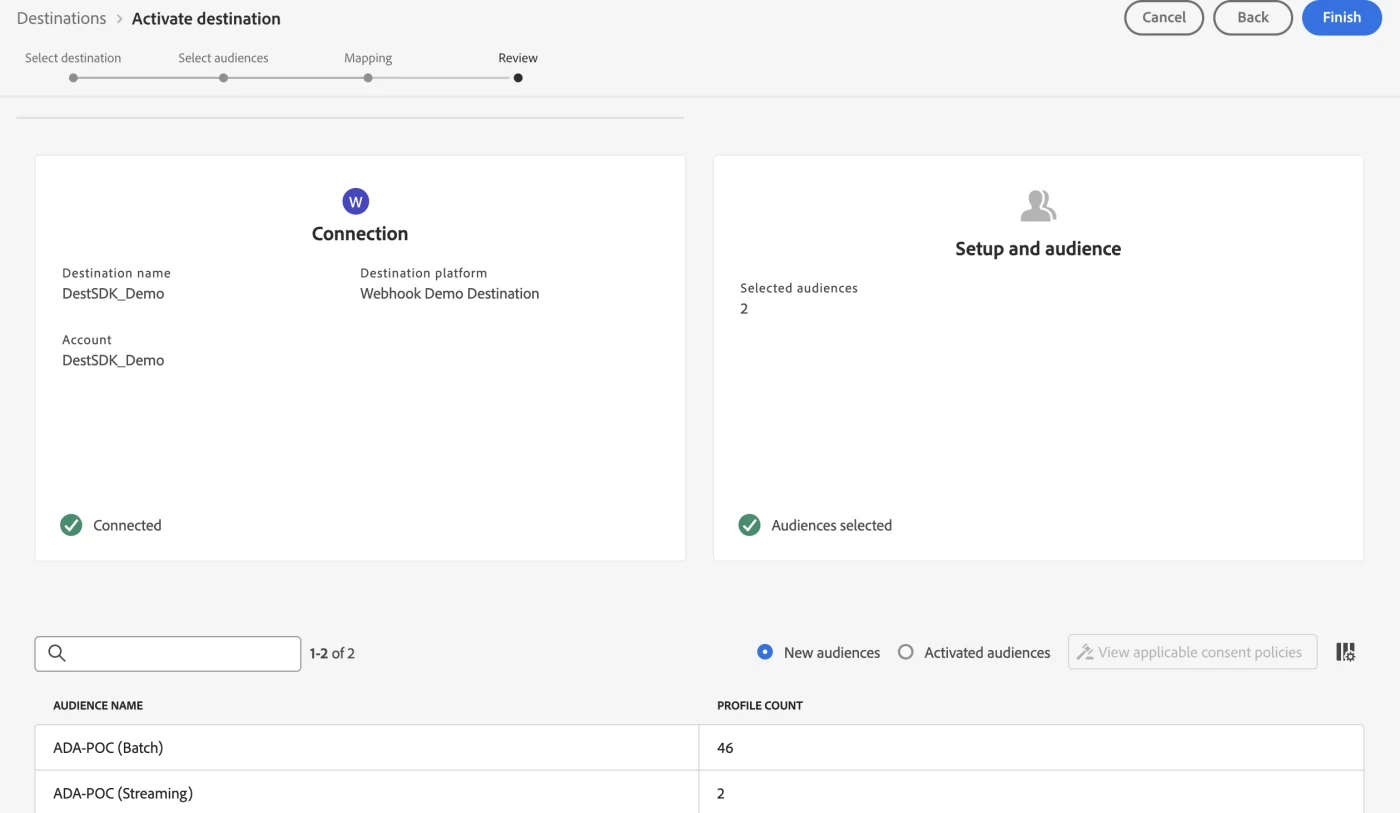
After mapping the segments a dataflow run will start, this can be seen under destination - View dataflow:
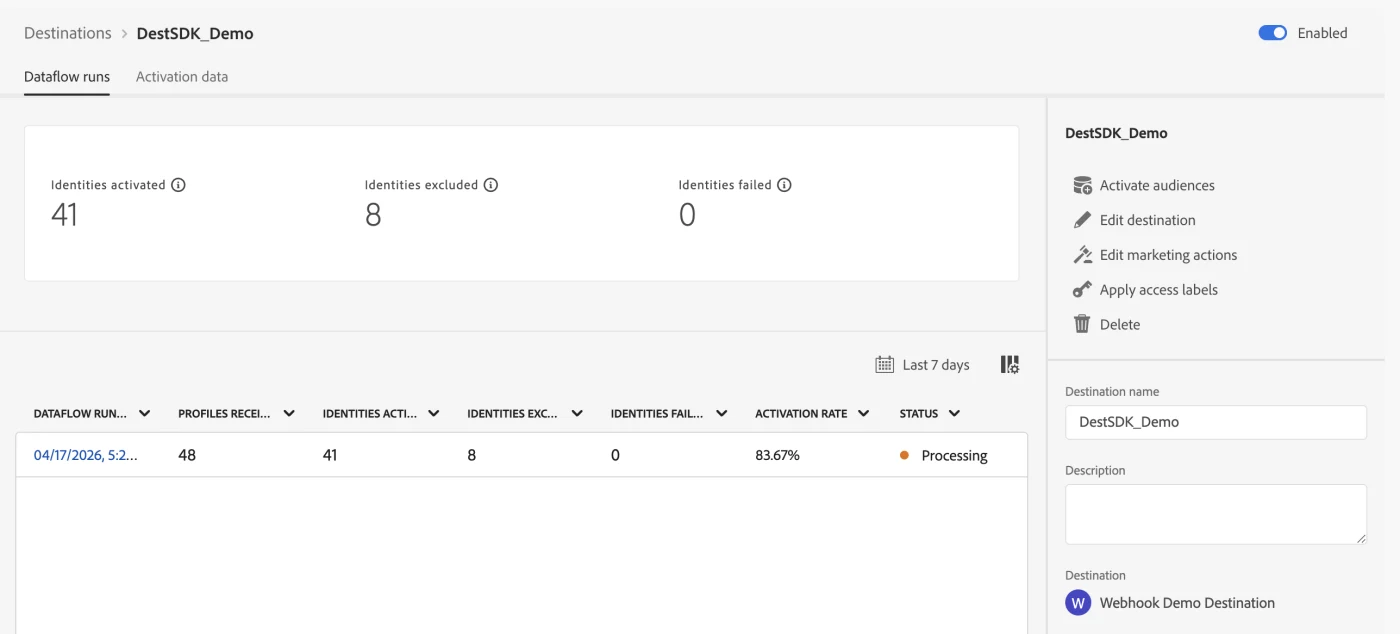
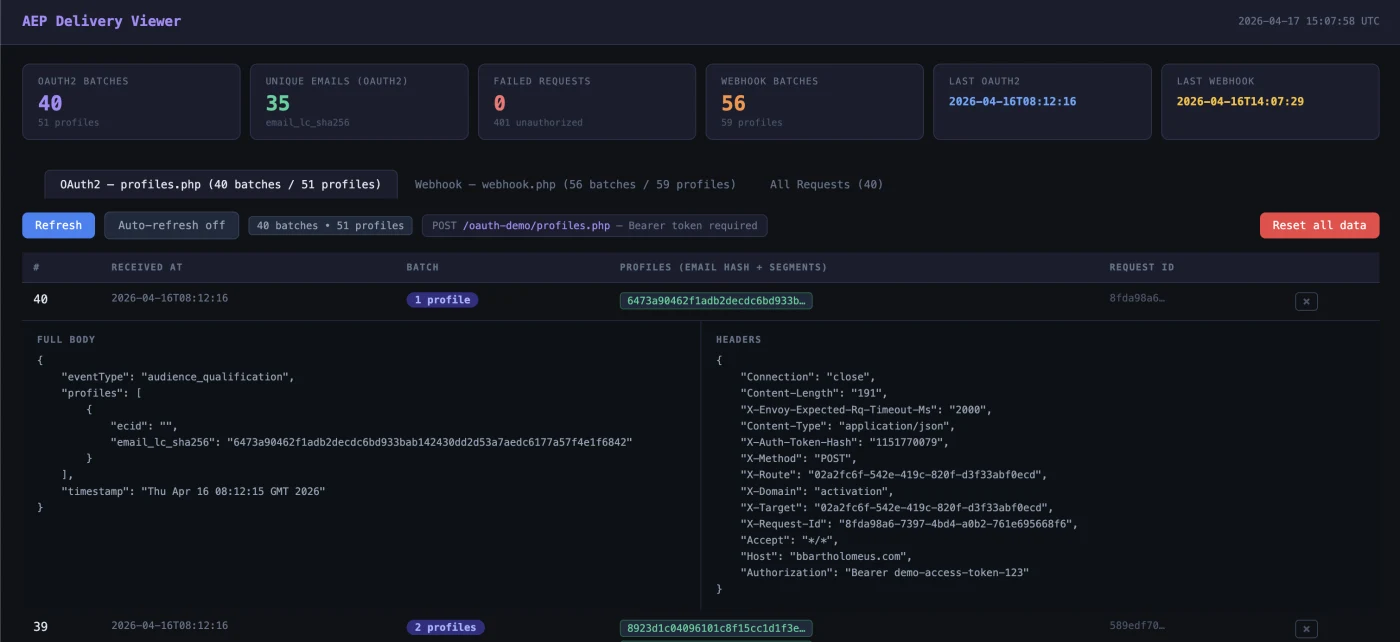
Step 10: Delivery Viewer: what arrives?
Once the destination is active, you want to see if the profiles actually arrive. The Delivery Viewer shows per incoming batch:
- Timestamp: when the batch was received
- Profile count: how many profiles are in this batch
- Identifiers: the hashed email (email_lc_sha256) and ECID per profile
- Segment status: 'realized' (newly qualified) or 'exited'
- Full body and headers: the complete payload including request headers for debugging
The statistics at the top provide a quick overview: number of OAuth2 batches, unique emails, webhook batches, failed requests and timestamps of the latest deliveries.
Payload: small but deliberate
The payload contains three elements that matter:
- A current timestamp: without a recent date nothing qualifies in streaming evaluation (time window: 24 hours)
- An identityMap: at least two identifiers (Email_LC_SHA256 and ECID) so that identity stitching can take place
- An event field (pageName): the field used in the segment rule as a qualification criterion
A successful delivery in your webhook log:
{
"eventType": "audience_qualification",
"profiles": [
{
"ecid": "40162906559973217547089191428526615272",
"email_lc_sha256": "3f78bda40b1de9d1b98f9c2de074...",
"segments": [{ "id": "6babb636-...", "status": "realized" }]
}
],
"timestamp": "2026-04-16T14:07:29Z"
}
Edge versus streaming evaluation
The segment rule in this POC was simple: qualify if web.webPageDetails.name equals poc-test-page. In theory edge evaluation seems logical, because the events arrive via Edge. In practice the edge segmentation service on my sandbox gave a recurring 502.
That was not an ingestion problem: the data came in and identities were stitched, but the issue was in the segmentation service itself. The workaround: disable edge evaluation on the datastream and switch to streaming evaluation. After that, the profile qualified immediately.
This also explains the difference in profile counts in the Audiences step: the streaming audience qualifies only on new events, the batch audience also includes historical records. See also audience evaluation methods
Identity stitching and mapping: the subtle problem
This was the most time-consuming part. The mapping of identities to the webhook seemed trivial. In practice, the runtime structure turned out to be different from what the documentation suggests.
Lowercase namespaces: in the payload the keys are called email_lc_sha256 and ecid, not the variant with capital letters as in the AEP UI.
The correct Pebble template:
{{ profile.identityMap.email_lc_sha256[0].id | default('') }}
If you miss the casing or the array index, the identity field remains silently empty. No error message appears; the webhook simply receives an empty identifier. This is exactly the kind of detail where you can lose hours.
Destination SDK: server versus config
Destination SDK consists of two building blocks that are frequently confused:
- Destination server:determines how and where AEP delivers the data: endpoint, HTTP method, content-type and Pebble template.
- Destination config:determines what is available and how the destination behaves in AEP: identity namespaces, mapping and aggregation rules, and UI presentation.
The tool creates both objects separately and links them automatically. In this POC I used a URL-based server with a simple webhook, deliberately without authentication. First prove the transport layer, then add auth.
OAuth extension: authenticated destinations
After the basic flow worked, I took a step further. In production you don't want to push to an anonymous webhook. I built a mock OAuth2 service:
- Token endpoint (/oauth/token): accepts client_id, client_secret and grant_type=client_credentials, returns a dummy token
- Protected endpoint (/api/endpoint): requires Authorization: Bearer <token>, sends 401 for an invalid token and logs the payload
- Logging: all requests are logged with timestamp, headers and body
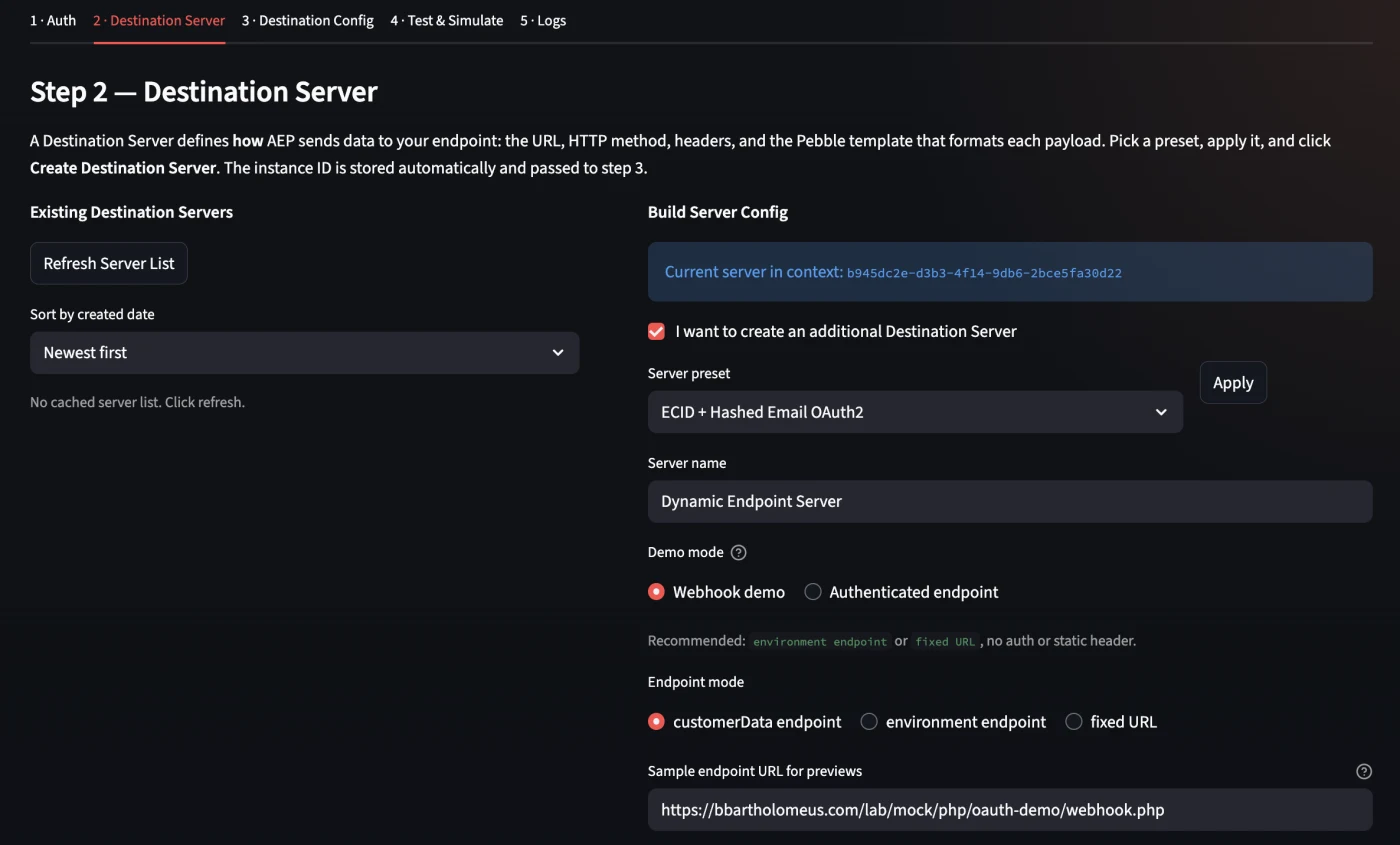
For this setup too you can use the preset under Step 2 - Destination Server in the Streamlit app:
You can use the server template below for this configuration:
{
    "name": "Dynamic Endpoint Server (OAuth2)",
    "destinationServerType": "URL_BASED",
    "urlBasedDestination": {
        "url": {
            "templatingStrategy": "PEBBLE_V1",
            "value": "{{customerData.endpointUrl}}"
        },
        "splitUserById": false
    },
    "httpTemplate": {
        "requestBody": {
            "templatingStrategy": "PEBBLE_V1",
            "value": "{\"timestamp\":\"{{ now() }}\",\"eventType\":\"audience_qualification\",\"profiles\":[{% for profile in input.profiles %}{\"email_lc_sha256\":\"{{ profile.identityMap.email_lc_sha256[0].id | default('') }}\",\"segments\":[{% for segment in profile.segmentMembership.ups %}{\"id\":\"{{ segment.key }}\",\"status\":\"{{ segment.value.status }}\"}{% if not loop.last %},{% endif %}{% endfor %}]}{% if not loop.last %},{% endif %}{% endfor %}]}"
        },
        "httpMethod": "POST",
        "contentType": "application/json",
        "headers": []
    },
    "qos": {
        "name": "freeform"
    }
}
You can find the setup under Step 3 - Destination Config in the Streamlit app.
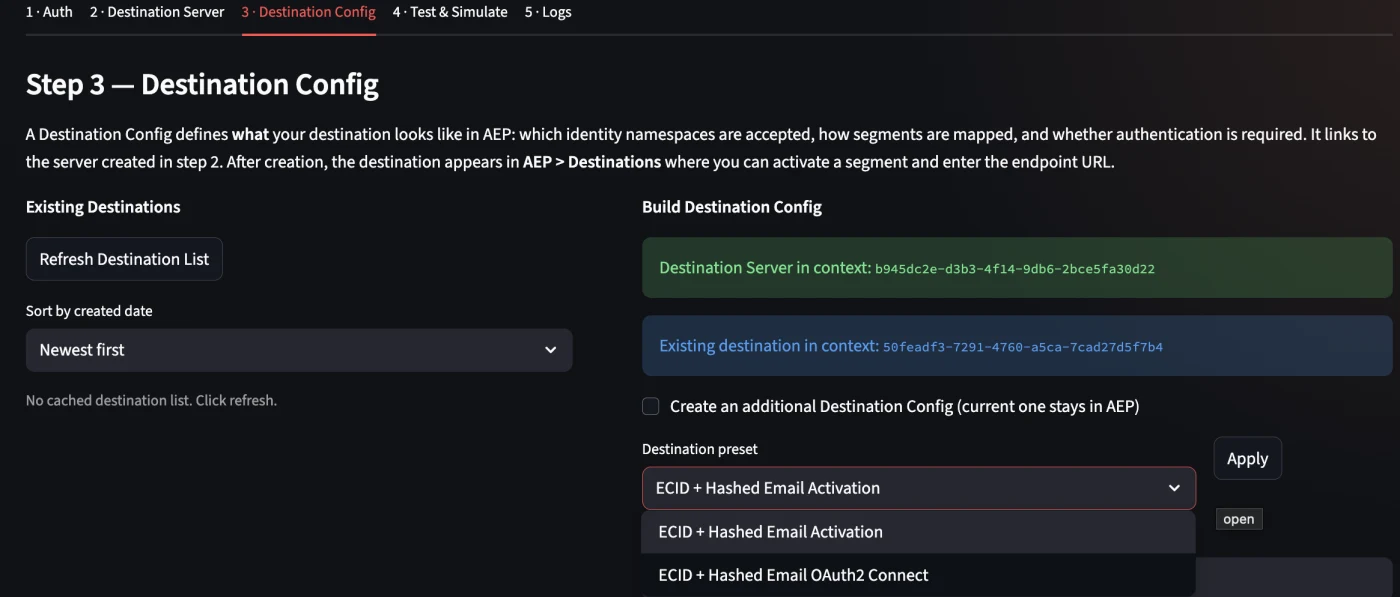
Figure 13: To set up an OAuth, choose "ECID + Hashed Email OAuth2 Connect" destination preset
For this example I used the following destination preset template:
{
  "name": "ECID + Hashed Email OAuth2 Demo",
  "status": "TEST",
  "customerAuthenticationConfigurations": [
    {
      "authType": "OAUTH2",
      "grant": "OAUTH2_AUTHORIZATION_CODE",
      "accessTokenUrl": "https://bbartholomeus.com/lab/mock/php/oauth-demo/token.php",
      "authorizationUrl": "https://bbartholomeus.com/lab/mock/php/oauth-demo/authorize.php",
      "scope": [],
      "refreshTokenUrl": "https://bbartholomeus.com/lab/mock/php/oauth-demo/token.php",
      "clientId": "demo-client-id",
      "clientSecret": "https://va7prod1activationakv.vault.azure.net/secrets/<clientsecret reference>"
    }
  ],
  "customerDataFields": [
    {
      "name": "endpointUrl",
      "title": "Endpoint URL",
      "description": "HTTPS endpoint AEP calls",
      "type": "string",
      "isRequired": true,
      "readOnly": false,
      "hidden": false
    }
  ],
  "uiAttributes": {
    "documentationLink": "https://experienceleague.adobe.com/docs/experience-platform/destinations/destination-sdk/overview.html",
    "connectionType": "Server-to-server",
    "frequency": "Streaming",
    "monitoringSupported": true,
    "flowRunsSupported": true
  },
  "identityNamespaces": {
    "Email_LC_SHA256": {
      "required": true,
      "acceptsAttributes": false,
      "acceptsCustomNamespaces": false,
      "acceptedGlobalNamespaces": {
        "Email_LC_SHA256": {}
      }
    },
    "ECID": {
      "required": false,
      "acceptsAttributes": false,
      "acceptsCustomNamespaces": false,
      "acceptedGlobalNamespaces": {
        "ECID": {}
      }
    }
  },
  "segmentMappingConfig": {
    "mapExperiencePlatformSegmentName": true,
    "mapExperiencePlatformSegmentId": true,
    "mapUserInput": false
  },
  "aggregation": {
    "aggregationType": "BEST_EFFORT",
    "bestEffortAggregation": {
      "maxUsersPerRequest": 100,
      "splitUserById": false
    }
  },
  "destinationDelivery": [
    {
      "authenticationRule": "CUSTOMER_AUTHENTICATION",
      "destinationServerId": "a78cfda0-e552-4855-b27e-8326481a3860"
    }
  ],
  "inputSchemaId": "d03c041f1d21460ba9ef5448823850be",
  "schemaConfig": {
    "profileFields": [],
    "useCustomerSchemaForAttributeMapping": false,
    "requiredMappingsOnly": false,
    "profileRequired": false,
    "segmentRequired": true,
    "identityRequired": true
  },
  "maxProfileAttributes": 9000,
  "maxIdentityAttributes": 1000,
  "destConfigId": "aec47886-5756-4320-8752-29980cdf28cb",
  "backfillHistoricalProfileData": false
}
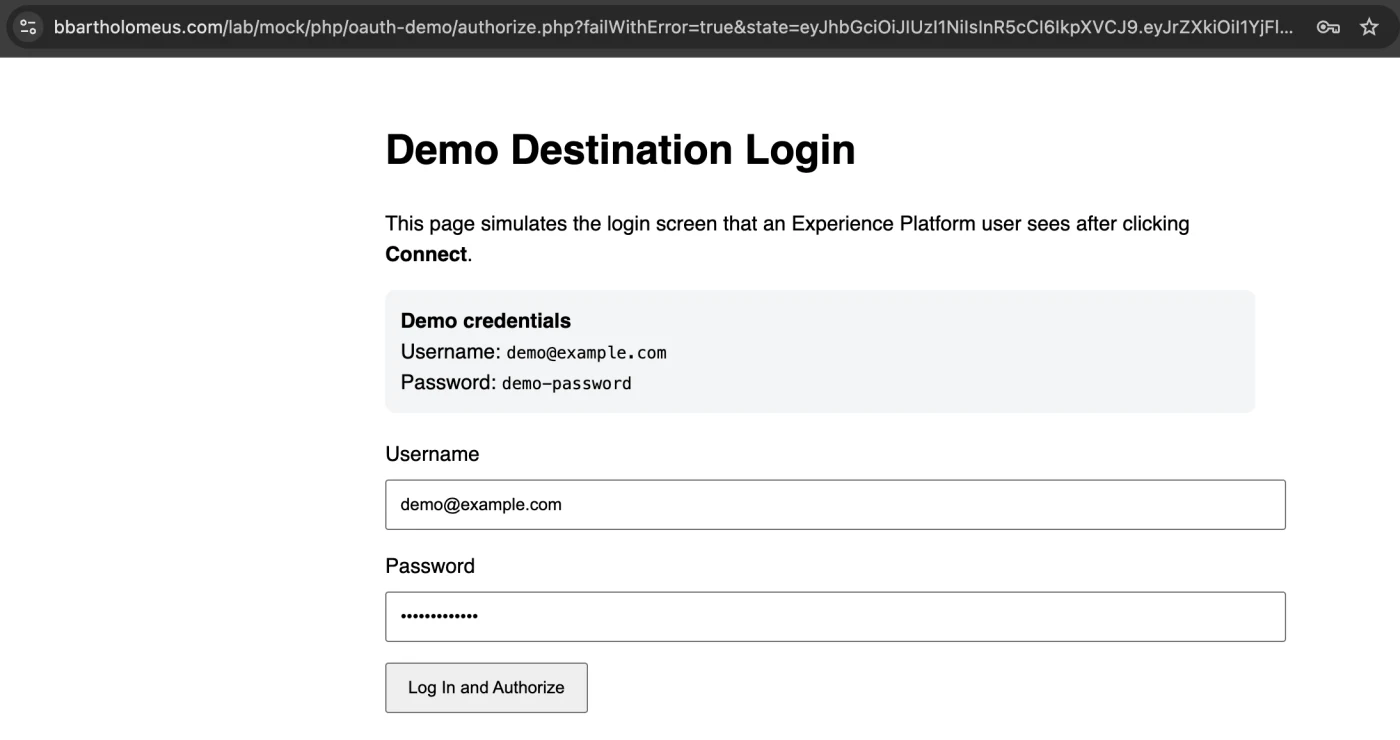
With this mock you can test authenticated destinations without external dependencies. AEP fetches a token, injects it in the header and delivers the profile to the protected endpoint.
Validation: how do you know it works?
The biggest pitfall in AEP is the feeling of false certainty. I validated via four routes:
- Dataset activity: gives an indication that events are landing, but sometimes lags behind
- Preview dataset: useful for small numbers
- Query Service: with this you can see exactly which records have been stored and whether the identities are correct
- Identity graph viewer: when ECID and Email_LC_SHA256 are linked to each other, you know that profile stitching works
Only when event, dataset, identity stitching and profile are correct does segmentation make sense. Always check in this order.
Common mistakes and how to prevent them
- Lowercase namespaces: the documentation uses Email_LC_SHA256, the runtime payload delivers email_lc_sha256.
- Silent failures: AEP doesn't throw an error if a mapping is empty. You only see it in your webhook.
- False positives: a 200 response on your Edge call doesn't mean the segment qualifies.
- Status TEST vs PUBLISHED: affects only the UI, delivery works the same.
- Expired timestamp: the timestamp must be current (within 24 hours).
Applications outside of marketing
Destination SDK provides a solution everywhere you want to send real-time or near-real-time profile decisions to an external system and Adobe doesn't offer a standard connector:
- Suppression flows for legal compliance
- Custom DSP integrations without native connector
- Internal activation APIs for call centers or CRM systems
- Real-time fraud detection
- Data clean rooms
- Debugging endpoints to inspect payloads during development
Lessons learned
- You don't need a complete website:A single Edge Network Server API call is enough to simulate events.
- Identity mapping is subtle: Lowercase keys and proper array usage are essential. One mistake leads to an empty payload without an error message.
- Edge evaluation is not always stable: Streaming evaluation is more reliable in a POC context.
- Destination SDK is about contract definition: Authentication, identifiers, payload structure and delivery rules: not about a generic event bus.
- Never test only on a 200 response: Use Query Service and the identity graph to see if the data actually lands.
- Mock auth is sufficient for a POC: You don't need to use a real OAuth provider to understand and test the mechanism.
Want to try this yourself?
If you want to reproduce this setup yourself or build a similar integration, I'm happy to help.
The Destination SDK Lab tool is not publicly available, but is shared upon request. If you set your environment variables correctly, you go through the complete flow, from live webhook delivery to auth token to, without cumbersome manual intermediate steps. This is not a sales pitch, but an invitation to experience the value of Destination SDK practically.
Send me a message and we'll look together at what makes sense for you.
Outlook
In this POC, the focus was deliberately on the basics: transport, stitching, qualification and delivery. The next step is more interesting: automate authentication further and make the endpoint more realistic.
With that you can for example show:
• how customer authentication in Destination SDK is set up further
• how you set up a fake or real authenticated endpoint
• how you further automate the test flow with Python CLI and Streamlit
• how you simulate a DSP-like endpoint with vendor-specific identifiers and payload contracts
That is the logical next step. But first the basics had to be right. And they are now.
Summary
The main conclusion is simple:
You don't need a complete website with Adobe Web SDK to test a Destination SDK integration end-to-end.
With a smart combination of:
• Edge Network Server API
• a correctly configured datastream
• identity stitching
• streaming segment evaluation
• a private Destination SDK destination
• and a simple webhook endpoint
you can prove the entire chain in a reproducible POC.
What this POC mainly shows is that building a destination is not the difficult part.
The difficult part is understanding how the components really work together, and where the documentation stops and reality begins.